Generally, the content of a block box is confined to the
content edges of the box. In certain cases, a box may overflow, meaning its
content lies partly or entirely outside of the box, e.g.:
- A line cannot be broken, causing the line box to be wider than the
block box.
- A block-level box is too wide for the containing block. This may
happen when an
element's 'width' property has a
value that causes the generated block box to spill over
sides of the containing block.
- An element's height exceeds an explicit height assigned to the containing
block (i.e., the containing block's height is determined by the 'height' property, not by content
height).
- A descendant box is positioned
absolutely, partly outside the box. Such boxes are not always
clipped by the overflow property on their ancestors; specifically,
they are not clipped by the overflow of any ancestor between
themselves and their containing block
- A descendant box has negative margins, causing it
to be positioned partly outside the box.
- The 'text-indent' property causes an inline box to hang off either the left or right edge of the block box.
Whenever overflow occurs, the 'overflow' property specifies
whether a box is clipped to its padding edge, and if so, whether
a scrolling mechanism is provided to access any clipped out content.
-
'overflow'
-
| Value: | visible | hidden | scroll | auto | inherit
|
| Initial: | visible
|
| Applies to: | block containers
|
| Inherited: | no
|
| Percentages: | N/A
|
| Media: | visual
|
| Computed value: | as specified
|
This property specifies whether content of a block container element is
clipped when it overflows the element's box. It affects the clipping
of all of the element's content except any descendant elements (and
their respective content and descendants) whose containing block is the viewport or an ancestor of the element. Values have the following meanings:
- visible
- This value indicates that content is not clipped, i.e., it
may be rendered outside the block box.
- hidden
- This value indicates that the content is clipped and that no
scrolling user interface should be provided to view the content outside the
clipping region.
- scroll
- This value indicates that the content is clipped and that if the
user agent uses a scrolling mechanism that is visible on the screen
(such as a scroll bar or a panner), that mechanism should be displayed
for a box whether or not any of its content is clipped. This avoids
any problem with scrollbars appearing and disappearing in a dynamic
environment.
When this value is specified and the target medium is
'print', overflowing content may be printed.
- auto
- The behavior of the 'auto' value is user agent-dependent, but
should cause a scrolling mechanism to be provided for overflowing boxes.
Even if 'overflow' is set
to 'visible', content may be clipped to a UA's document window by the
native operating environment.
UAs must apply the 'overflow' property set on the root element to
the viewport.
When the root element is an HTML "HTML" element or an XHTML "html"
element, and that element has an HTML "BODY" element or an XHTML
"body" element as a child, user agents must instead apply the
'overflow' property from the first such child element to the
viewport, if the value on the root element is 'visible'.
The 'visible' value when used for the viewport
must be interpreted as 'auto'. The element from which the value is
propagated must have a used value for 'overflow' of 'visible'.
In the case of a scrollbar being placed on an edge of the element's
box, it should be inserted between the inner border edge and the outer
padding edge. Any space taken up by the scrollbars should be taken out
of (subtracted from the dimensions of) the containing block formed by
the element with the scrollbars.
Example(s):
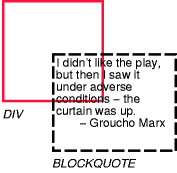
Consider the following example of a block quotation
(<blockquote>) that is too big
for its containing block (established by a <div>). Here is
the source:
<div>
<blockquote>
<p>I didn't like the play, but then I saw
it under adverse conditions - the curtain was up.</p>
<cite>- Groucho Marx</cite>
</blockquote>
</div>
Here is the style sheet controlling the sizes and style of the
generated boxes:
div { width : 100px; height: 100px;
      border: thin solid red;
      }

blockquote   { width : 125px; height : 100px;
      margin-top: 50px; margin-left: 50px;
      border: thin dashed black
      }

cite { display: block;
       text-align : right;
       border: none
       }
The initial value of 'overflow' is 'visible', so
the <blockquote> would be formatted without clipping, something like this:
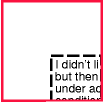
Setting 'overflow' to
'hidden' for the <div>, on the other hand, causes the
<blockquote> to be clipped by the containing
<div>:
A value of 'scroll' would tell UAs that support
a visible scrolling mechanism to display one so that users
could access the clipped content.
Finally, consider this case where an absolutely positioned element
is mixed with an overflow parent.
Style sheet:
  container { position: relative; border: solid; }
  scroller { overflow: scroll; height: 5em; margin: 5em; }
  satellite { position: absolute; top: 0; }
  body { height: 10em; }
Document fragment:
  <container>
   <scroller>
    <satellite/>
    <body/>
   </scroller>
  </container>
In this example, the "scroller" element will not scroll the
"satellite" element, because the latter's containing block is outside
the element whose overflow is being clipped and scrolled.
A clipping
region defines what portion of an element's
border box
is visible. By default, the element is not clipped. However, the clipping region may be explicitly set with the 'clip' property.
-
'clip'
-
| Value: | <shape> | auto | inherit
|
| Initial: | auto
|
| Applies to: | absolutely positioned elements
|
| Inherited: | no
|
| Percentages: | N/A
|
| Media: | visual
|
| Computed value: | 'auto' if specified as 'auto', otherwise a rectangle with four
values, each of which is 'auto' if specified as 'auto' and the
computed length otherwise
|
The 'clip' property applies only to absolutely positioned elements.
Values have the following meanings:
- auto
- The element does not clip.
- <shape>
- In CSS 2.1, the only valid <shape> value is:
rect(<top>, <right>, <bottom>, <left>)
where <top> and <bottom> specify offsets from
the top border edge of the box, and <right>, and <left> specify offsets from the
left border edge of the box. Authors should separate
offset values with commas. User agents must support separation with
commas, but may also support separation without commas (but not a
combination), because a
previous revision of this specification was ambiguous in this respect.
<top>, <right>,
<bottom>,
and <left> may
either have a <length>
value or 'auto'. Negative lengths are permitted. The value 'auto'
means that a given edge of the clipping region will be the same as the
edge of the element's generated border box (i.e., 'auto' means the same as '0' for <top> and <left>, the same as the used
value of the height plus the sum of
vertical padding and border widths for <bottom>, and the same as the
used value of the width plus the sum of the horizontal padding and
border widths for <right>,
such that four 'auto' values result in the clipping region being
the same as the element's border box).
When coordinates are rounded to pixel coordinates, care should be
taken that no pixels remain visible when <left> and
<right> have the same value (or <top> and <bottom>
have the same value), and conversely that no pixels within the
element's border box remain hidden when these values are 'auto'.
An element's clipping region clips out any aspect of the element (e.g., content, children, background, borders, text decoration, outline and visible scrolling mechanism — if any) that is outside the clipping region.
Content that has been clipped does not cause overflow.
The element's ancestors may also clip portions of their content (e.g., via their own 'clip' property and/or if
their 'overflow' property is
not 'visible'); what is rendered is the cumulative intersection.
If the clipping region exceeds the bounds of the UA's
document window, content may be clipped to that window by the
native operating environment.
Example(s):
Example:
The following two rules:
p#one { clip: rect(5px, 40px, 45px, 5px); }
p#two { clip: rect(5px, 55px, 45px, 5px); }
and assuming both Ps are 50 by 55 px, will create, respectively,
the rectangular clipping regions delimited
by the dashed lines in the following illustrations:
Note. In CSS 2.1, all clipping
regions are rectangular. We anticipate future extensions to permit
non-rectangular clipping. Future updates may also reintroduce a
syntax for offsetting shapes from each edge instead of offsetting from
a point.
-
'visibility'
-
| Value: | visible | hidden | collapse | inherit
|
| Initial: | visible
|
| Applies to: | all elements
|
| Inherited: | yes
|
| Percentages: | N/A
|
| Media: | visual
|
| Computed value: | as specified
|
The 'visibility' property
specifies whether the boxes generated by an element are
rendered. Invisible boxes still affect layout (set the 'display' property to 'none' to
suppress box generation altogether). Values have the following
meanings:
- visible
- The generated box is visible.
- hidden
- The generated box is invisible (fully transparent, nothing is drawn), but still
affects layout. Furthermore, descendants of the element will
be visible if they have 'visibility: visible'.
- collapse
- Please consult the section on
dynamic row and column
effects in tables. If used on elements other than rows, row groups, columns, or column groups,
'collapse' has the same meaning as 'hidden'.
This property may be used in conjunction with scripts to create
dynamic effects.
In the following example, pressing
either form button invokes an author-defined script function that causes
the corresponding box to become visible and the other to be
hidden. Since these boxes have the same size and position, the effect
is that one replaces the other. (The script code is in a hypothetical
script language. It may or may not have any effect in a CSS-capable
UA.)
<!DOCTYPE HTML PUBLIC "-//W3C//DTD HTML 4.01//EN">
<HTML>
<HEAD><TITLE>Dynamic visibility example</TITLE>
<META
 http-equiv="Content-Script-Type"
 content="application/x-hypothetical-scripting-language">
<STYLE type="text/css">
<!--
   #container1 { position: absolute;
                 top: 2in; left: 2in; width: 2in }
   #container2 { position: absolute;
                 top: 2in; left: 2in; width: 2in;
                 visibility: hidden; }
-->
</STYLE>
</HEAD>
<BODY>
<P>Choose a suspect:</P>
<DIV id="container1">
   <IMG alt="Al Capone"
        width="100" height="100"
        src="suspect1.png">
   <P>Name: Al Capone</P>
   <P>Residence: Chicago</P>
</DIV>

<DIV id="container2">
   <IMG alt="Lucky Luciano"
        width="100" height="100"
        src="suspect2.png">
   <P>Name: Lucky Luciano</P>
   <P>Residence: New York</P>
</DIV>

<FORM method="post"
      action="http://www.suspect.org/process-bums">
   <P>
   <INPUT name="Capone" type="button"
          value="Capone"
          onclick='show("container1");hide("container2")'>
   <INPUT name="Luciano" type="button"
          value="Luciano"
          onclick='show("container2");hide("container1")'>
</FORM>
</BODY>
</HTML>


